Thursday, December 19, 2013

Chicken Meatballs

So, today I made my cleaning supplies for the whole house & didn't feel like making a huge dinner. I had been thawing ground chicken without a plan and wondered about chicken meatballs. I found this recipe and modified it to fit our needs. So, here's to a quick (yet hearty and yummy) dinner!

1 lb ground chicken
1/2 c bread crumbs
6 cloves garlic, crushed
1 t basil
1 t oregano
A couple pinches of salt
Ground pepper 
1 large organic egg 

400 degree oven. 
Mash ingredients all up together in a bowl, using your hands or a wooden spoon, until thoroughly combined. 
I like to form a rectangle about a heavy-inch-thick and slice into 12-15 squares. I sometimes use a pizza wheel or a large knife. (This is supposed to be easier than spooning individual meat balls... if it doesn't make your life easier try it another way!) 
Roll each meat square into a meat ball (haha) then place on a baking stone, in a cast iron skillet or on a parchment lined cookie sheet. 
Bake for 20-25 mins. 
Make sure your chicken is no longer pink and reached at least 140 degrees Fahrenheit (check this with a meat thermometer in the center of the largest meatball). Consuming undercooked meat/eggs can cause serious illness. 

Wednesday, December 18, 2013

Immune Boosting Master Tonic

About a year ago I learned about a spicy concoction named Master Tonic. We had a serious cold that turned into an upper respiratory infection at the beginning of the flu season but I was determined to avoid antibiotics if at all possible. This made for some rough nights and grumpy days.... However, I do believe that drinking my Master Tonic (along with rest, fluids, homemade vapor rubs and teas) was the key to avoiding antibiotics!
This stuff is not only great for an acute issue like the flu or a cold, but also for daily use as a pro biotic-of-sorts, and to give your body that extra protection against the germs you encounter. My sister-in-law drinks this each morning mixed into her orange juice, my husband takes a shot or two each evening and more often when feeling the sniffles and I like to take a half-shot ever day or so to ward off the germs and to keep my digestive tract running smoothly (pun intended). It is simple to make and fun to wait for (it should steep for two weeks) but if you're in  need of it immediately I recommend blending the ingredients until the veggies are like a pulp and leaving to steep overnight (24 hours would be best). Ok - so here's how I create my Master Tonic:

Gallon Glass Jar
2 large white onion
2 heads of garlic
1 ginger root
1 horseradish root (I found mine at Whole Foods)
5-10 spicy peppers - I use a mixture of jalepeno, habanero, chili and pablano peppers
Fresh herbs (rosemary, thyme)
Turmeric Powder
Cayenne Pepper Powder
Apple Cider Vinegar (enough to cover all ingredients) usually I buy 2 32oz 365 brand organic and it's plenty!

Steps:
Chop all your veggies (or use a heavy blender like a vitamix or a ninja)
Add fresh herbs and a Tablespoon or two of your powdered herbs
Cover with ACV
Place lid on jar
You want to keep this away from sunlight, so put in a cabinet or cover with a paper bag or towel
Shake it up daily for two weeks - this can be tough as the jars get heavy. If you have trouble lifting heavy items it could also work with less of all ingredients in a smaller jar.

The first time I made Master Tonic I used these glass jars. Here are the ingredients already peeled and ready to chop!
Here are the chopped ingredients.
The Master Tonic is steeping!!!

Here's how it looks after it is strained (left) and some of the pulp I kept from one round I made from all-peeled veggies. It is great as an additive to soups, sauces and/or used as a relish. Make sure to peel all your veggies and wash the ones who won't be peeled!
The lovely ladies over at HealThyself.com (not an affiliate but a fan for sure!) recommend reading this site if you're interested in the properties of the ingredients (ie: garlic has antibacterial properties) and the science behind why they're so effective. Thanks to Heal Thyself for the original recipe and for sharing this treat!

Follow me on Pinterest!

Thursday, December 5, 2013

Tardis Blanket for a Twin Bed

Two of my daughters are really into Dr Who! and this weekend we are celebrating one of their birthdays. She's young (turning 7) so we only allow her to watch one or two mild episodes over and over but she loves the tenth Doctor (says he looks like her daddy). We also happen to be moving her into a twin bed so I thought it fitting (and budget friendly) to combine the two events. We have new-to-us Hello Kitty sheets (no pillow case) and I thought a Tardis bed spread would be awesome. Have you ever priced these things?! I'm sorry but I'm not paying this much for a child's bed covering! I could only find instructions on how to crochet or knit a beautiful tardis blanket but I don't have time (or a teacher) so I needed to make my own pattern... So, I am making a fringed, fleece, tardis bedspread for this birthday weekend.  

What I used:
Blue fleece 2.25 yards 66"
Green fleece (for the back) 2.25 yards 66"
White fleece (remnant & could have used any white fabric) 
Black heavy fabric that I already had on hand (grab those old pants out of your hubby's closet! You know the ones I'm talking about. He never wears them, back-of-the-closet or bottom-drawer, they  aren't the right size... Go now!)
Black paint (I used black fabric "puffy")
Gold paint
Brass buttons (to look like he tacked the note on the door)
I actually messed up with my markings (maybe I shouldn't have used permanent lol) so, I turned this side in and started my measurements again
I used chalk on my black fabric to write the words. 
Here's a shot of the side that isn't messed up. All sewn and ready to be marked!

All marked and ready for the paint!
I did the paint in stages. Here, it is almost finished. 
A close-up of the note posted on the door of the Tardis. I used a marker to write it out (I would recommend using something washable like chalk), then the paint and after messing up I wound up upsizing from my original pattern anyway!

And here it is finished & on the bed.


She loves it and wears it all around the house like a robe! Success! 

Happy mama

Monday, November 25, 2013

Easy, inexpensive dog food.

So, my mother in law casually mentioned making dog food with ground turkey and frozen veggies one day and started a quest for me. For the last 18+ mos I've adjusted the recipe and, with help from my mom, perfected a sort of assembly line for making the food and feeding the dog. Our current method is 6 lbs ground turkey, one can sliced carrots, one can shredded beets and one can potatoes (sliced, diced, mashed lol), two eggs, 4-6 cloves garlic, minced and occasionally I throw in cooked brown rice, chopped pasta, bread crumbs, etc. I do not always use a grain and vary depending on what is available as leftovers or in the pantry. Dogs don't need the grain and the root veggies are good for the vitamins and fiber. I mash all the ingredients together in a big bowl, press it into a 9x13 pan, place this on a cookie sheet and bake at 425 for 40-60 mins until the internal temp reaches 140• Fahrenheit. Allow to cool, slice into individual portions. My dog is 7 lbs so I get about 20-25 meals from this recipe. Wrap in wax, plastic, parchment or foil and freeze. I pull out two portions each night for the next day's meals and microwave for a few seconds to take the chill off. My Husband has a cute habit of adding cheese, sour cream, or even part of our meal - gravy, potatoes etc. Kibbles is a lucky dog and he treats us well in return. We love you Kibbles!!!!

Super easy, flaky biscuits from scratch!

So, I decided to stop using bisquick a while back which has made for some difficult dinner choices. Tonight, it was chicken & dumplings giving me pause. My chicken and dumplings are amazing... my Husband remembers me making them back when we dated! I've tried making the noodle kind (like his mom) but we all miss that fluffy biscuit floating in our bowl. So, changing the recipe is not easy. I found this amazing recipe for drop biscuits and decided to give it a try - boy was I in for a surprise! We loved it & wound up using the leftover dough to make biscuits for the next morning. I've adapted the recipe to work for our family since there are six of us and I will be tripling the recipe from now on. Below is the doubled recipe with my adjustments :)


4.5 c all-purpose flour
1.5 t sea salt
2 t sugar
8 t baking powder
2/3 c butter
2 c milk

Preheat oven to 450
Place all dry ingredients in a bowl and whisk to mix well.
Cut butter into flour mixture using a pastry cutter, knife or your hands (making sure it doesn't melt the butter) until the buttery pieces are the size of peas.
Add cold milk and use a wooden spoon or plastic dough scraper to toss the ingredients together until just together before lifting out of the bowl onto a lightly floured surface. 
Gently knead until it's mostly combined (we're not looking for a smooth dough here) and press (or roll) into a rectangle about an half inch thick. Now, here's where you can get creative... Use biscuit cutters to make round ones, use a pizza cutter to roll through the dough and make square ones, or cut anyway you like and place in a pan with melted butter or coconut oil and then you have a crispy bottom biscuit! Any which way you make these they are AMAZING!
Bake at 450 for 8-10 mins until golden brown and gorgeous.

Thank you to http://blog.kitchenmage.com/2008/01/simple-flaky-bi.html for the original recipe. 

Wednesday, November 20, 2013

Roasted chicken soup

One of my friends recently moved and while cleaning out her basement she found a Litton Simmer Pot and she gave it to me! A couple months earlier I had  put out a plea for stone bakeware to all my friends & family (and Facebook haha) and she remembered me! She also handed over a square baking dish and an original round cake - all pampered chef - hardly used and one original! So, I'm feeling like I've hit the jackpot except that I'm not really sure what to do with this pot. I grab my phone and google "litton simmer pot" and discovered that this lidded pot was the key to roasting chickens! My freezer happened to have 5 whole chickens - organic and local - just begging to be roasted. It's super important to follow the instructions so your pot doesn't crack so be sure to soak it and only place it in a cold oven (never preheat)! My favorite way to season the chicken is with onion, garlic, salt & pepper. I like to rough-chop the onion and garlic and stuff the chicken with them, adding a few sprigs of rosemary and thyme. I will sometimes add cubed potatoes around the chicken (they're super tender and tasty) but this time I mashed my potatoes and roasted a few Brussels sprouts and carrots. The chicken cooks for about an hour which gives me time to prep these veggie sides- chop the potatoes, add to a pot of water and boil until tender. While that's cooking, cut the ends of your Brussels sprouts and then I like to slice them again in half. Mince about 6 cloves of garlic and place in oil (I use primarily olive and coconut) to allow the flavors to mingle. I like to place the sliced sprouts in a bowl and pour the garlic oil over the top, use my hand to stir and saturate, pour onto a stone bake dish and spread so that they are not overlapping, then sprinkle with Celtic sea salt and crushed pepper. Bake in a 425 degree oven until just browned and tender. I sometimes add baby carrots to this dish which is also super yum! Potatoes should be ready to drain and mash - I like to add whipping cream, Greek yogurt, sour cream, butter (whatever you have) and a bit of crushed pepper and salt. I prefer some lumps, so I hand mash instead of whipping. Voila! Dinner is made!

Now, a way to make this stretch into other meals........

As soon as we were finished with dinner I placed the chicken bones and the rest of the chicken into the crockpot, covered it with water and a sprinkle of Celtic sea salt, then turned it on low over night. For dinner prep I remove the large pieces of chicken and bones from the crockpot, pour the liquid thorough a strainer to grab all the little bones and pour the clean liquid back in the crockpot (adding if needed to make a bigger pot of soup). I like to let the chicken pieces cool while I chop the veggies and season the water - using any combination of the following: carrot, celery, sweet potato, white potato, squash, zucchini, peppers, chard (chard stalks are great sliced like celery) brown rice, barley, quinoa, pasta, lentils, black beans, kidney beans, onion, garlic, tomato (crushed, paste, sauce etc), Celtic sea salt, black pepper, cayenne, paprika, bay leaves, thyme, red pepper flakes, etc. I just like a good combination of veggies, spices, herbs, grains, beans/legumes, and time. I'll let the crock pot simmer and develop flavors while I separate the chicken from the bones and grissle and fat - discard these items and place chicken in the crock as well. Check the flavors about every hour and adjust with more seasoning, salt & garlic. This soup will last a few days in the fridge and is great for lunches with a hot grilled sandwich, or alone!  

Wednesday, March 27, 2013

Coconut oil

Coconut Oil Is probably my favorite product on the planet. I had never heard of it before my mother in law gave us a bottle for Christmas - this was about two years ago. Now, I use it daily in many different areas of the kitchen, bath and bed rooms. Coconut Oil smells marvelous, feels so soft on my skin, tastes yummy in my coffee, is a delicious ingredient for homemade candy (buckeye people should switch), great spread on my toast or waffles, is a super boo-boo salve for my baby's busted chin, is awesome on a mild diaper rash, washes away the dirt on my face, conditions my hair, nourishes my skin after a shower, is the reason my handmade deodorant is so awesome, sautés garlic and kale amazingly & is even condom safe (yep) and a whole plethora fun ;)
 
Oil Pulling - whiten your teeth, prevent/reverse tooth decay, and inhibits the growth of streptococcus
Solid Hand Lotion - nourishes and creates a layer on your skin protecting from infection

Facial Cleanser/Moisturizer - leaves skin feeling smooth and may fight those tiny lines around the eye
Kitchen Fun - pop it in a hot pan and fry a couple organic, free range eggs in it, spread it on some toast, drop in a hot cup of coffee.
Lowers Bad Cholesterol - "Coconut oil has a saturated fat called lauric acid, a type of MCT. It has been shown that lauric acid increases the good HDL cholesterol in the blood to help improve cholesterol ratio levels.  Coconut oil lowers cholesterol by promoting its conversion to pregnenolone, a molecule that is a precursor to many of the hormones our bodies need."
Helps Improve Thyroid Function - "The medium chain fatty acids found in coconut oil also help in rebuilding cell membranes and increasing the enzyme production that assists in promoting the conversion of thyroid hormones for use by the body (T4 to T3)."
Personal Lubricant - silky smooth, melts on contact, smells sensational, fights candida and is condom safe!

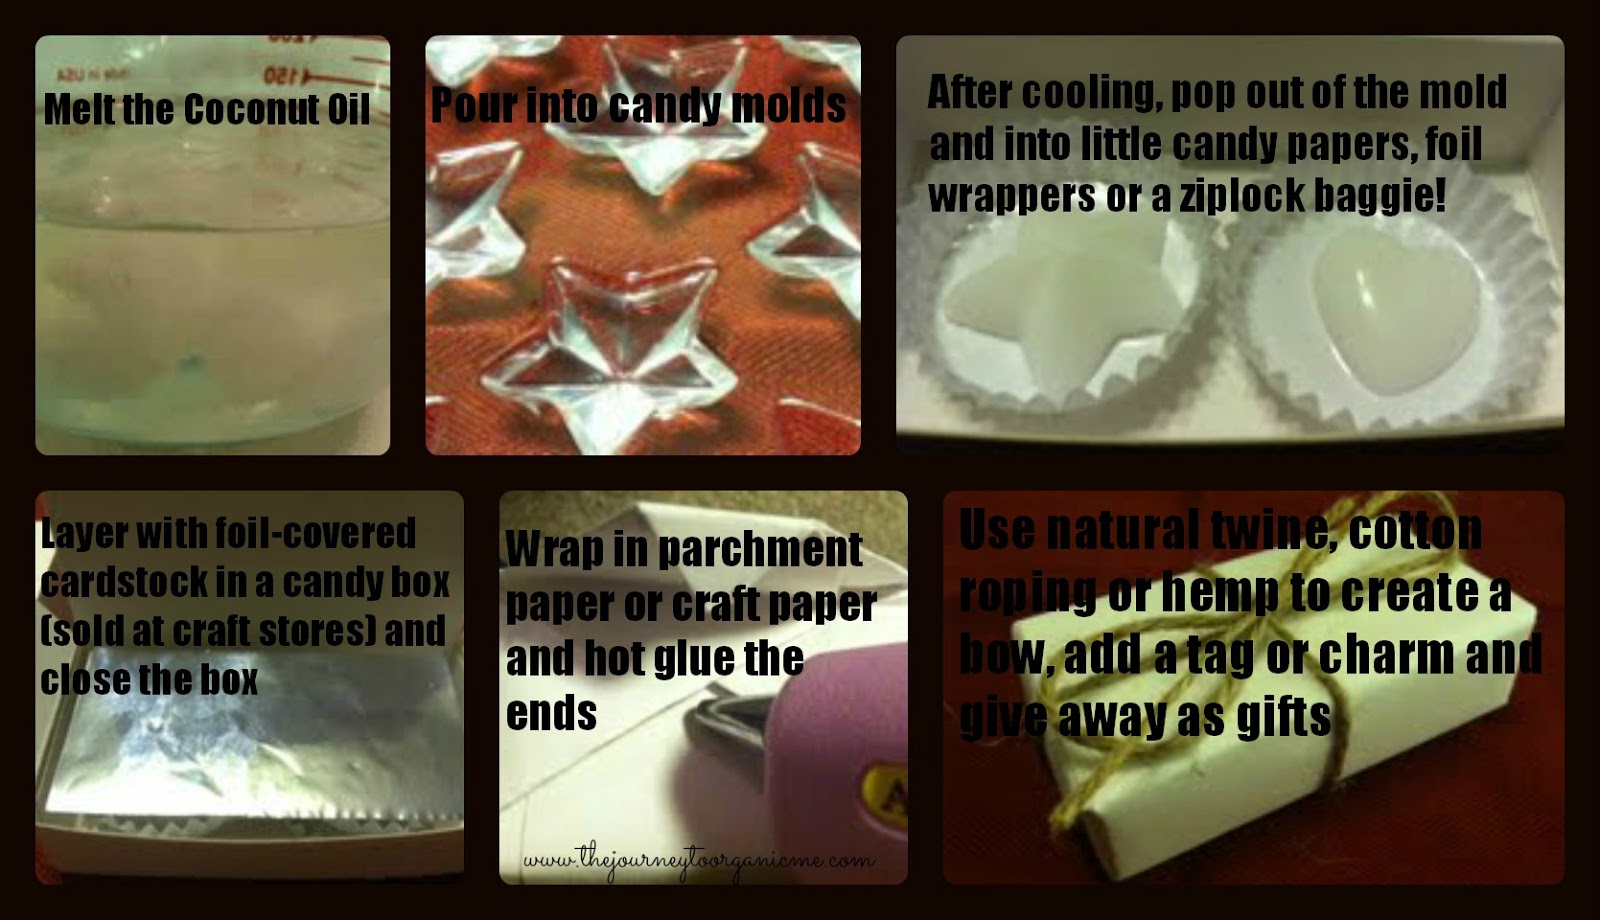
I recently made a coconut oil based deodorant and coconut meltables and sent a few to friends and family. Pics below!


Place all ingredients in a gallon size zip-close baggie, squeeze out the air, zip it closed and mash away! The heat of your hands will warm and soften the coconut oil and infuse the other ingredients. When it is about the consistency of butter cream icing, clip the corner of the baggie off and use it like an icing bag to squeeze it in your glass jar! This amount lasts my husband and I about two months. This time around I made a double batch, twisted the end of the baggie with a rubber band and put in it a dark cabinet. It's already solid and won't leak out. If you live in warmer climates be sure to keep it in a cool, dark place as it's melting point is 74-76 degrees Fahrenheit. Some even suggest the fridge but I haven't been using it in the warm season as of yet, so I cannot comment!

These are great for all kinds of things: drop it in your morning coffee, use it to wash your face & moisturize after a bath, condition your hair, solid lotion bar (keep in your purse), lip moisturizer, next to your bed to smooth under your eyes (helps fight those tiny lines), as a personal lubricant (condom safe and fights candida), place it on a hot waffle or toast, melt it in a hot pan and fry an egg...

Sarah

Follow Me Here on Pinterest, Facebook
http://oilpulling.com/oilpullingscience.htm
http://www.coconut-connections.com/skin_care.htm
http://www.doctoroz.com/videos/surprising-health-benefits-coconut-oil
http://articles.mercola.com/sites/articles/archive/2012/12/08/coconut-oil-combats-tooth-decay.aspx
http://www.hybridrastamama.com/2013/02/coconut-oil-for-intimate-uses.html

Sunday, March 17, 2013

Saint Patrick's Day

Most of my genealogy stems back to Ireland so I am fond of this day, but at 34 and a mother of 3.5 (three full time & privileged to have my step daughter every other weekend etc) the sentiment of this day has certainly morphed. I find myself thinking of my grandpa (paternal) Fred who was proud of being Irish, proud of his name Frederick, proud of his country - to be honest I think even as I write this I realize he was a great example of humble confidence. My St Patty's Day memories of him include oversized green ties, shamrocks and laughter; paper projects and sweet treats... Probably similar to your first holiday memories. It then morphs into a celebration of beer & how much the Irish like to drink it. Green beer, Irish brands, cheap beer - didn't really matter as long as it was beer! Haha lots of foggy memories with painful days-after. The next transformation revisits the paper projects and sweet treats with my twin daughters (now 16) with my dad playing the part of grandpa. We can always count on shamrock flecked socks from my mom for all of us to wear to school and work - never forgetting to wear green, of course! Four years ago my Husband and I took a walk, held hands and kissed for the first time in about 7 years (a story for another time) and were married 7 months later which adds romance to my St Patty's Day book of memories! Today, I made a memory with my baby boy. He's just turned two and is trying to communicate. He jabbers non-stop all day long in broken English barely getting his meaning across. This is a frustrating time in his life! Three times this week he asked for a specific show using his choo-choo word. I started with Thomas & he said no, then Dinosaur Train and he said no to that too! He wound up howling and red-faced because I didn't know what he was saying :( broke mama's heart! This morning he started requesting it again, I attempted the same solutions I'd tried before and he began to cry when his sis mentioned Blues Clues. The look of relief that passed across his sweet face was just precious! He was finally understood & his big sis was a hero! My St Patrick's Day celebrations will likely revisit paper crafts and sweet treats again with the baby but, now I'm warm with memories from my childhood, fun with my sweet girl's and a forever-blooming romance with the handsome man in an Ireland t-shirt reclaiming the heart that was always his.

Wishing you always walls for the wind,
A roof for the rain,
Tea beside the fire,
And the love and laughter of those you hold dear.
Happy Saint Patrick's Day!!


Thanks to http://www.celticcolours.com/blessingsandtoast.aspx for the Irish Blessing!

Monday, March 4, 2013

Reusable Menstrual Pads


Reusable Cloth Menstrual Pads… I know how weird it sounds.

I have to be honest here and say that I hate my period. HATE IT & I do not want it to visit me anymore but I’m 34 and do not want to alter my body with surgery or take artificial hormones! I am beyond my desire to have more children(we have four between us and the baby is just two right now) so, I am coming to terms with the fact that I could have 10 or 15 more years of this visitor in some way or another. I need to own it. Learn to love it? I’d settle for tolerating it…. 
A few years ago I was reading “Gorgeously Green” where she mentions reusable menstrual pads and my first thought is, “Why would anyone want to do that?” I had to check this out because I wasn’t sure if I hated theidea or loved it. 
My Google search led me to The Organic Institute's website where they talk about the chemicals and fibers used in conventional tampons and pads:
"Most tampons that are sold in the stores are chlorine-bleached and made from 100% rayon or a mixture of conventionally grown cotton and rayon.
 Rayon is a synthetic fibre derived from wood pulp that is commonly chlorine-bleached to make it fully absorbent. Surfactants are also used in tampons to increase absorbency.
These super absorbent fibres absorb not only the menstrual blood, but also normal vaginal secretions resulting in dryness of vaginal tissues.
The fibres can also become embedded in the vaginal walls and amplify the production of Toxic Shock Syndrome Toxin which causes Toxic Shock Syndrome (TSS), a potentially fatal illness.
 Chlorine bleaching of the wood pulp produces dioxin. Research suggests that dioxin is an endocrine disrupting chemical that mimics oestrogen and disrupts hormonal function within the body. It has been linked to immune system suppression, breast cancer, reproductive and developmental problems. 
For a comprehensive article on the effects of endocrine-disrupting chemicals, check out the Endocrine Society Scientific Statement. You will be shocked by what you read! 
Dioxin pollution also poses a serious environmental problem as it is found throughout the environment worldwide in varying levels. It accumulates in the fatty tissues of animals and humans for decades."

The EPA says this about dioxins: "This background exposure [they are speaking of our daily exposure in the air, water and in our food - not even considering the extra exposure women and girls experience monthly] is likely to result in an increased risk of cancer and is uncomfortably close to levels that can cause subtle adverse non-cancer effects in animals and humans." 

Endocrine disruption? Immune suppression? Cancer??

I had to figure out a way to cut this out of my routine and fast! One of the companies recommended by Gorgeously Green was LunaPads who have a whole line of reusable pads, pantyliners, menstrual, thong and even the Diva Cup which is a reusable menstrual cup to replace tampons. I wish I had known about the alternatives earlier in life! I have been using LunaPads pantyliners for more than three years (and I love them), but have decided to make these at home in stead! If you are wanting to try this yourself but would prefer to spend pennies for your first try, then I recommend using old t-shirts, towels and other materials in your home or at your local thrift store. Be sure to clean the garments before use!

Materials:
1.5-2 yards of soft, cotton cloth for your cover. I chose astretchy t-shirt material that was on clearance.
1 yard PUL fabric
2-3 spools of heavy cotton thread
1 yard of absorbent middle (I am using scraps from abathrobe project I finished a month ago. The fabric is called “Ultra CuddleFleece”) you could use towels you are not using any more, flannel or any otherabsorbent cloth
Snaps (I like two per pad to keep in place)
Your favorite disposable pads in the size(s) you plan tocreate
Scissors
Long pins

So, here’s what I did (with pictures!):
  1. Find your favorite-fit disposable pads and trim (if desired) to fit. Use this template to trace on the backside of your cotton cover and PUL fabrics. I used three sizes to make templates for overnight/super long, regular and daily mini’s. Make sure the tabs overlap (if not, add how ever much is needed to make them overlap) so that when attaching the snaps they will reach!


  1. Take paper and place over top the disposable pad template and trace the cushioned absorbent middle for each size you are making. Cut the template out and trace onto your absorbent middle fabric (flannel, fleece, cotton etc). My Ultra-Cuddle Fleece is furry so I have decided to pin several layers together and just cut them out. I’m not looking for perfection here, just a good cut and a nice fit.

  1. Sew the bottom cover to the PUL fabric using a single stitch about a ¼ of an inch from the edge all the way around the circumference. This will bring the two pieces together and secure them without puncturing the PUL fabric in the middle where it should be a leak-barrier.


  1. Pin and sew the absorbent middle to your top cover using a single stitch around the circumference.
    1. Overnight/super long: use three layers of absorbent middle, or two layers with scraps of material sandwiched between them (see photo)
    2. Regular: use two layers of the absorbent middle
    3. Mini’s: use one layer
I am quilting the overnight andregular to keep them from bunching with use.


  1. Pin the edges of your bottom and your top together. Be careful not to puncture your PUL fabric more than necessary and pinch the absorbent middle  between the layers. Use a three-step zig zag around the entire circumference of the pad.
 

  1. Trim the edges


  1. The snaps are attached by hand.


I hand wash these as they are used & allow them to dripdry. On laundry day I soak them all in water with a bit of bleach alternativefor about 15 minutes before washing them in the machine. They sometimes needreshaping before hanging to dry.

If you are interested in this project for yourself, then I’mhappy to give advice! Whether you choose to make the switch or not, I encourageyou to visit LunaPads.com and see what theyoffer. Likethem on Facebook too!


The Journey to Organic Me!