Thursday, January 9, 2014

Cough syrup

I decided I wanted to make my own cough syrup this year and I was pleased to see I had all of the ingredients already in my pantry!

Grab an 8 oz glad jar with a lid - I used a Ball jar. 

2 Tablespoons each dried:

Ginger root

Echinacea root

Dandelion root

Marshmallow root

Fennel seed

4Tablespoons dried Elderberries

Pour enough bourbon to cover herbs (check a few hours later and top off as they may soak up the liquid and swell above the liquid - this is bad because they can mold). Place jar in a paper sack or in a dark cabinet. 

Shake daily or every few days for 3-4 weeks. 

Use a fine mesh strainer to remove the herbs and roots. Using a coffee filter or cheesecloth as a second step will remove any tiny fibers the mesh strainer left behind. 

I keep this infusion in a dark cabinet until we are in need. When we begin to feel the sniffles I will add honey and lemon to taste and refrigerate for up to a month. 

I've tasted this concoction (before adding honey and lemon) and it definitely needs flavor but it smells just like the cough syrup my mom used to buy at the pharmacy. 


Please keep in mind - I am no doctor and this should never replace a visit to your naturopath or family physician if you're feeling ill. 

Sunday, January 5, 2014

An ode to summer... soup!

We're waiting for a major freeze here in Ohio and the Bengals are in the playoffs. This is a great day for hot soup! I am so thankful that I froze the leftovers from our summer garden because today's soup is an ode to summer in deed. I suppose this meal started a few days ago when I roasted an organic chicken, placed the leftovers (bones, neck, meat, onion, etc) in a crockpot and simmered it for 24 hours. Today, I strained the bones and bits through a mesh strainer and poured the broth into a stock pot. I like to stretch my broth by adding water (a lot will steam off anyway). A couple tablespoons of Celtic sea salt and fresh ground black pepper to start the soup while I chop veggies. I sift through my freezer and realize I have enough summer veggies to make a beautiful soup. Chard stems (used as I would celery), kale, corn, peas, cabbage, cauliflower, onion, garlic; seasoned with thyme, rosemary, tarragon, salt and fresh ground black pepper. After an hour (or so) of simmering I add a package of egg noodles and set off making some butter swim biscuits. 
I hope this gives you inspiration to save your summer veggies for an ode to summer soup, leaving the snow and cold outside your window!

Thursday, December 19, 2013

Chicken Meatballs

So, today I made my cleaning supplies for the whole house & didn't feel like making a huge dinner. I had been thawing ground chicken without a plan and wondered about chicken meatballs. I found this recipe and modified it to fit our needs. So, here's to a quick (yet hearty and yummy) dinner!

1 lb ground chicken
1/2 c bread crumbs
6 cloves garlic, crushed
1 t basil
1 t oregano
A couple pinches of salt
Ground pepper 
1 large organic egg 

400 degree oven. 
Mash ingredients all up together in a bowl, using your hands or a wooden spoon, until thoroughly combined. 
I like to form a rectangle about a heavy-inch-thick and slice into 12-15 squares. I sometimes use a pizza wheel or a large knife. (This is supposed to be easier than spooning individual meat balls... if it doesn't make your life easier try it another way!) 
Roll each meat square into a meat ball (haha) then place on a baking stone, in a cast iron skillet or on a parchment lined cookie sheet. 
Bake for 20-25 mins. 
Make sure your chicken is no longer pink and reached at least 140 degrees Fahrenheit (check this with a meat thermometer in the center of the largest meatball). Consuming undercooked meat/eggs can cause serious illness. 

Wednesday, December 18, 2013

Immune Boosting Master Tonic

About a year ago I learned about a spicy concoction named Master Tonic. We had a serious cold that turned into an upper respiratory infection at the beginning of the flu season but I was determined to avoid antibiotics if at all possible. This made for some rough nights and grumpy days.... However, I do believe that drinking my Master Tonic (along with rest, fluids, homemade vapor rubs and teas) was the key to avoiding antibiotics!
This stuff is not only great for an acute issue like the flu or a cold, but also for daily use as a pro biotic-of-sorts, and to give your body that extra protection against the germs you encounter. My sister-in-law drinks this each morning mixed into her orange juice, my husband takes a shot or two each evening and more often when feeling the sniffles and I like to take a half-shot ever day or so to ward off the germs and to keep my digestive tract running smoothly (pun intended). It is simple to make and fun to wait for (it should steep for two weeks) but if you're in  need of it immediately I recommend blending the ingredients until the veggies are like a pulp and leaving to steep overnight (24 hours would be best). Ok - so here's how I create my Master Tonic:

Gallon Glass Jar
2 large white onion
2 heads of garlic
1 ginger root
1 horseradish root (I found mine at Whole Foods)
5-10 spicy peppers - I use a mixture of jalepeno, habanero, chili and pablano peppers
Fresh herbs (rosemary, thyme)
Turmeric Powder
Cayenne Pepper Powder
Apple Cider Vinegar (enough to cover all ingredients) usually I buy 2 32oz 365 brand organic and it's plenty!

Steps:
Chop all your veggies (or use a heavy blender like a vitamix or a ninja)
Add fresh herbs and a Tablespoon or two of your powdered herbs
Cover with ACV
Place lid on jar
You want to keep this away from sunlight, so put in a cabinet or cover with a paper bag or towel
Shake it up daily for two weeks - this can be tough as the jars get heavy. If you have trouble lifting heavy items it could also work with less of all ingredients in a smaller jar.
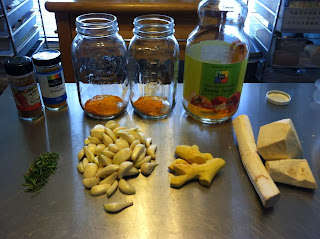
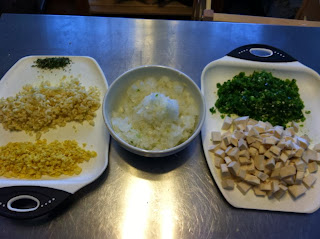
The first time I made Master Tonic I used these glass jars. Here are the ingredients already peeled and ready to chop!
Here are the chopped ingredients.
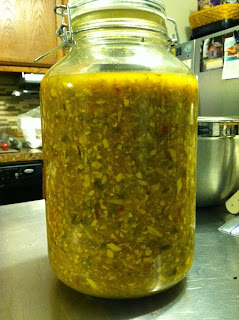
The Master Tonic is steeping!!!

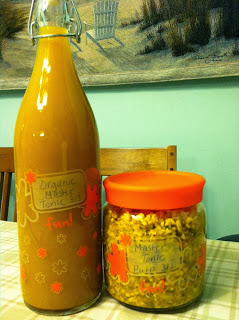
Here's how it looks after it is strained (left) and some of the pulp I kept from one round I made from all-peeled veggies. It is great as an additive to soups, sauces and/or used as a relish. Make sure to peel all your veggies and wash the ones who won't be peeled!
The lovely ladies over at HealThyself.com (not an affiliate but a fan for sure!) recommend reading this site if you're interested in the properties of the ingredients (ie: garlic has antibacterial properties) and the science behind why they're so effective. Thanks to Heal Thyself for the original recipe and for sharing this treat!

Follow me on Pinterest!

Thursday, December 5, 2013

Tardis Blanket for a Twin Bed

Two of my daughters are really into Dr Who! and this weekend we are celebrating one of their birthdays. She's young (turning 7) so we only allow her to watch one or two mild episodes over and over but she loves the tenth Doctor (says he looks like her daddy). We also happen to be moving her into a twin bed so I thought it fitting (and budget friendly) to combine the two events. We have new-to-us Hello Kitty sheets (no pillow case) and I thought a Tardis bed spread would be awesome. Have you ever priced these things?! I'm sorry but I'm not paying this much for a child's bed covering! I could only find instructions on how to crochet or knit a beautiful tardis blanket but I don't have time (or a teacher) so I needed to make my own pattern... So, I am making a fringed, fleece, tardis bedspread for this birthday weekend.  

What I used:
Blue fleece 2.25 yards 66"
Green fleece (for the back) 2.25 yards 66"
White fleece (remnant & could have used any white fabric) 
Black heavy fabric that I already had on hand (grab those old pants out of your hubby's closet! You know the ones I'm talking about. He never wears them, back-of-the-closet or bottom-drawer, they  aren't the right size... Go now!)
Black paint (I used black fabric "puffy")
Gold paint
Brass buttons (to look like he tacked the note on the door)
I actually messed up with my markings (maybe I shouldn't have used permanent lol) so, I turned this side in and started my measurements again
I used chalk on my black fabric to write the words. 
Here's a shot of the side that isn't messed up. All sewn and ready to be marked!

All marked and ready for the paint!
I did the paint in stages. Here, it is almost finished. 
A close-up of the note posted on the door of the Tardis. I used a marker to write it out (I would recommend using something washable like chalk), then the paint and after messing up I wound up upsizing from my original pattern anyway!

And here it is finished & on the bed.


She loves it and wears it all around the house like a robe! Success! 

Happy mama

Monday, November 25, 2013

Easy, inexpensive dog food.

So, my mother in law casually mentioned making dog food with ground turkey and frozen veggies one day and started a quest for me. For the last 18+ mos I've adjusted the recipe and, with help from my mom, perfected a sort of assembly line for making the food and feeding the dog. Our current method is 6 lbs ground turkey, one can sliced carrots, one can shredded beets and one can potatoes (sliced, diced, mashed lol), two eggs, 4-6 cloves garlic, minced and occasionally I throw in cooked brown rice, chopped pasta, bread crumbs, etc. I do not always use a grain and vary depending on what is available as leftovers or in the pantry. Dogs don't need the grain and the root veggies are good for the vitamins and fiber. I mash all the ingredients together in a big bowl, press it into a 9x13 pan, place this on a cookie sheet and bake at 425 for 40-60 mins until the internal temp reaches 140• Fahrenheit. Allow to cool, slice into individual portions. My dog is 7 lbs so I get about 20-25 meals from this recipe. Wrap in wax, plastic, parchment or foil and freeze. I pull out two portions each night for the next day's meals and microwave for a few seconds to take the chill off. My Husband has a cute habit of adding cheese, sour cream, or even part of our meal - gravy, potatoes etc. Kibbles is a lucky dog and he treats us well in return. We love you Kibbles!!!!

Super easy, flaky biscuits from scratch!

So, I decided to stop using bisquick a while back which has made for some difficult dinner choices. Tonight, it was chicken & dumplings giving me pause. My chicken and dumplings are amazing... my Husband remembers me making them back when we dated! I've tried making the noodle kind (like his mom) but we all miss that fluffy biscuit floating in our bowl. So, changing the recipe is not easy. I found this amazing recipe for drop biscuits and decided to give it a try - boy was I in for a surprise! We loved it & wound up using the leftover dough to make biscuits for the next morning. I've adapted the recipe to work for our family since there are six of us and I will be tripling the recipe from now on. Below is the doubled recipe with my adjustments :)


4.5 c all-purpose flour
1.5 t sea salt
2 t sugar
8 t baking powder
2/3 c butter
2 c milk

Preheat oven to 450
Place all dry ingredients in a bowl and whisk to mix well.
Cut butter into flour mixture using a pastry cutter, knife or your hands (making sure it doesn't melt the butter) until the buttery pieces are the size of peas.
Add cold milk and use a wooden spoon or plastic dough scraper to toss the ingredients together until just together before lifting out of the bowl onto a lightly floured surface. 
Gently knead until it's mostly combined (we're not looking for a smooth dough here) and press (or roll) into a rectangle about an half inch thick. Now, here's where you can get creative... Use biscuit cutters to make round ones, use a pizza cutter to roll through the dough and make square ones, or cut anyway you like and place in a pan with melted butter or coconut oil and then you have a crispy bottom biscuit! Any which way you make these they are AMAZING!
Bake at 450 for 8-10 mins until golden brown and gorgeous.

Thank you to http://blog.kitchenmage.com/2008/01/simple-flaky-bi.html for the original recipe.